We recently spent a day canning. Started first thing in the morning in the garden, picking corn and shucking it. Nice activity for a lovely summer morning. Then on into the house to cut and can the corn.
The corncobs seemed like too much goodness to just put back in the compost, so we made vegetable stock. Got two big stockpots for the cobs, added a few tomatoes, some green beans, kohlrabi, onions, carrots including their greens, fresh herbs and a few dried. Used our new 21,000 BTU burner and the side burner on our grill to make the stock. Let it cook slowly over several hours, took the stock off, added more water and did it again. And again! In the end we had 26 quarts of stock. We mixed the 3 different batches together so they would all be about the same concentration.
Wonderful start to some soups this winter!
Wednesday, August 23, 2006
Friday, August 11, 2006
Brined Zucchini Pickless Need More Work
Well, I'm not satisfied with how the brined zucchini pickles turned out. More experimentation is needed. Some possibilities are that they were cut, not whole, and that I may not have had a strong enough brine solution. When I get a chance I'll try some more with other solutions.
Monday, July 31, 2006
Monday, July 24, 2006
Brining Zucchini Pickles
On Friday I started some brined zucchini pickles. I happened to stop at a local discount store and saw a lovely, large glass vase. Clear glass, with a sort of swirled pattern, about 18-20 inches tall, lovely shape, narrowing down to an opening still large enough for me to put my hand in. Hmmm, looked perfect for pickles! And only $5.00. Home it came. I cleaned it, then tried to decide how to use all the lovely zucchini.
I decided on spears, since the zucchini's were pretty good sized (say mostly 3-day zuke's). We chunked them into spears about 3.5 to 4 inches long, either quartering each section, or cutting it into 8ths, depending on how big they were. As I layered the spears into the jar I added a pickling mix that we had purchased. I'd just found out the day before that pickling mixes were initialy intended for brined pickles, and this was my chance to try this one out.
Mixed up brine and put it over the full jar. I then used some of the remainder in a sandwich baggie, double bagged, which I put on top to keep the new pickles under the brine. It started bubbling by the next day. The spears are reducing in size, I presume as the salt pulls the water out of the spears. They sure look good. They should be ready in about 2 weeks.
Thursday, July 20, 2006
Domes and Clips
I was looking for some replacement clips for one that had broken and happened across this site. Since I live in a Geodesic dome, I really liked seeing some more. Putting our firewood inside a shelter like this might be nice, too.
The clips look good, too, and I'll probably get some in various sizes at some point.
The clips look good, too, and I'll probably get some in various sizes at some point.
Monday, July 17, 2006
Historic Fort Boonesborough and Boone's Station
I always have a good time when I go to Boonesborough, and now living history opportunities are opening up at Boone's Station as well. Here is a link to current happenings at Boonesborough and Boone's Station.
Thursday, July 13, 2006
New Frontier Resources blog
Frontier Resources now has it's own blog. I will continue to post some things here, but most Frontier Resources specific information will now be posted on that blog.
Wednesday, July 12, 2006
Wine Making Class at Listermann's in Cincinnati
Last night was my final wine making class. The class is held at Listermann's in Cincinnati, taught by Walt Huber. Walt has been making wine since 1974, and I sure learned a lot. I highly recommend this class.
There are 5 classes over 3 months. The first 2 classes are a week apart, the rest a month apart. Each student makes a batch of wine as part of the class. After the final class is a tasting of each students wine. It was fun tasting all the different wines. Some were from kits, some from concentrates, some from fresh fruits.
There are 5 classes over 3 months. The first 2 classes are a week apart, the rest a month apart. Each student makes a batch of wine as part of the class. After the final class is a tasting of each students wine. It was fun tasting all the different wines. Some were from kits, some from concentrates, some from fresh fruits.
Tuesday, July 11, 2006
Zucchini makes great pickles
Busy weekend pickling again. Last summer was the first I had made pickles, thanks to "The Joy of Pickling" by Linda Ziedrich. The Zucchini Bread & Butter recipe I liked even better than either of the other two Bread & Butter recipes, so this year we didn't plant cucumbers, instead planting lots and lots of zucchini and summer squash.
Well, those of you familiar with growing squash will know, when one has zucchini, one has lots of zucchini! We started picking the first of them this weekend. Sunday I canned 9 pints and 12 jelly jars (1/2 pints) of Zucchini Bread & Butter pickles. I used hot water bath canning as it's faster than the pressure canner for these high-acid foods.
I also tried another of the recipes that I'd enjoyed last year, an Asian type pickle. I don't have my book in front of me to verify the name of the recipe, but I think it was Sesame Pickle. This is a fresh pickle, which is ready to eat in just a few hours. One of my kids and I had enjoyed them very much last summer when made with Asian cucumbers.
This time I tried it with zucchini. We made a triple batch from two rather huge zucchini's, cutting out the seed area, and chunking the rest. I was thrilled with the results and will be eating a lot of this kind of pickle. I think I'll go through the book some more and see what else I can convert to use zucchini and summer squash!
Saturday, July 01, 2006
Hands On History - Spring 2006 - Town Meeting
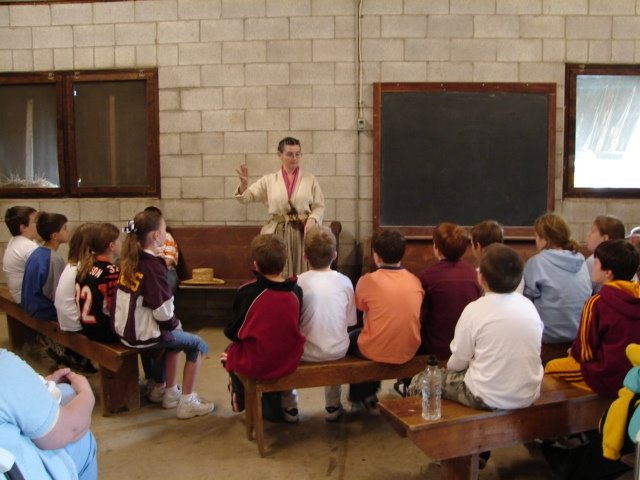
Here I am holding our Town Meeting, where students re-enact a Town Meeting in early America, learning about democracy and voting rights.
Hands On History - Spring 2006 - Woodworking
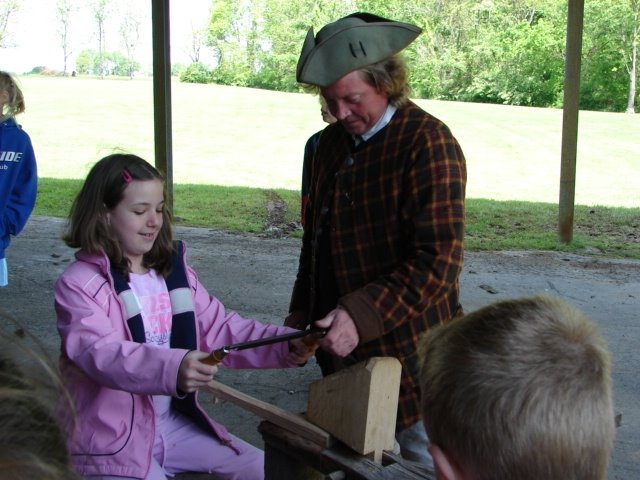 Mike Thompson teaches about woodworking. Here we see a student learning to use a draw knife.
Hands On History - Spring 2006 - Oxen and Wagon
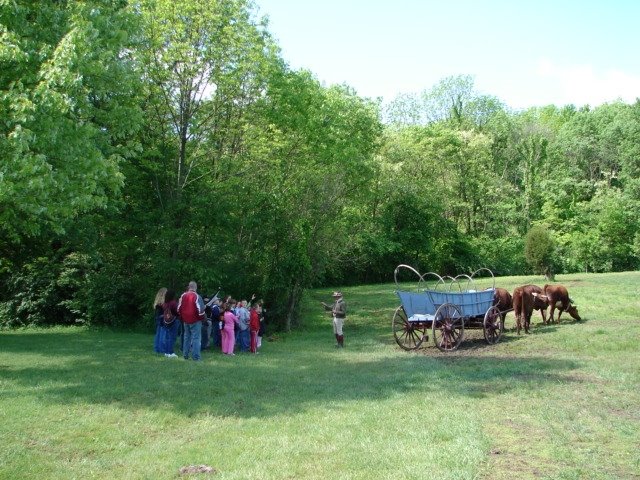 Wilmington Meeting members took some photos at Quaker Knoll Campground during the Spring session of the Hands On History program.
Here we have a group of students attending the Oxen/Freight station. Below is Gerry Barker teaching about early Freight.

Thursday, June 29, 2006
Hands On History - Brief description of topics
Some of the topics our Hands On History program may include, but are not limited to:
Our 2006 Autumn program runs October 3-6, 9-13 and 16-17, 2006. Our 2007 dates are May 14-24, 2007 and Oct 1-11, 2007. The program takes about 4 hours, running from 9:30 a.m. until 2:00 P.M, or as your busing schedule permits. Cost is $5.00 per student. There is no cost for teachers and chaperones.
Please contact me for additional information, or to schedule your visit.
OXEN- An explanation of the importance of oxen to early
QUAKER HISTORY - Early Quaker History and how Quaker's influenced Southwestern Ohio and the Early United States.
CHILDREN’S WORK- A view of the importance of children on the frontier while they work to shape a grindstone.
FRONTIER
TOWN MEETING- Students experience frontier democracy by taking part in a town meeting and wrestling with a vital issue of the day.
SPINNING- An introduction to the problem of cloth supply for the
CHILDREN’S GAMES- A look at entertainment on the frontier while students try an outdoor game of the 1800s.
WESTERN MOVEMENT -
INDENTURED SERVITUDE- Forty percent of the population of Colonial America arrived under terms of indenture. This station examines the lives of the children who found themselves so situated.
Our 2006 Autumn program runs October 3-6, 9-13 and 16-17, 2006. Our 2007 dates are May 14-24, 2007 and Oct 1-11, 2007. The program takes about 4 hours, running from 9:30 a.m. until 2:00 P.M, or as your busing schedule permits. Cost is $5.00 per student. There is no cost for teachers and chaperones.
Please contact me for additional information, or to schedule your visit.
Hands On History - Overview
For several years Frontier Resources, a non-profit organization I'm involved with, has offered a school program designed to capture the interest of the student of Ohio
Frontier Resources is an organization that designs and presents programs to students all over the country. Our specialty is “Hands-On History”. Our programs are designed to give students a taste of the activities, both work and play, of children of early
Quaker Knoll Campground is a lovely site on the north end of Cowen Lake State Park.
Our 2006 Autumn program runs October 3-6, 9-13 and 16-17, 2006. Our 2007 dates are May 14-24, 2007 and Oct 1-11, 2007. The program takes about 4 hours, running from 9:30 a.m. until 2:00 P.M, or as your busing schedule permits. Cost is $5.00 per student. There is no cost for teachers and chaperones.
Please contact me for additional information, or to make your reservation.
Tuesday, June 27, 2006
Brittany Bay - Celtic Music
Those of you in the Cincinnati area or who are Contra Dancers may know of Brittany Bay, a local Celtic band. They are one of my very favorite bands, both to listen to and to dance to!
Where to get Wine Making Kits
Yesterday I posted about wine making kits without mentioning where to get them. I have been happy with service at Listermann's, but have also seen them locally at a few other places, like Jungle Jim's. Please note that while Listermann's web page isn't as fancy as that of some other sellers, like Midwest Supplies, they do in fact carry about everything. As they told me when I mentioned it, at Listermann's they're "Beer guys", not so much into computer stuff. And Listermann's ships free east of the Mississippi.
Oh, and I should say I am in no way involved with any of these businesses. Just a satisfied customer.
Oh, and I should say I am in no way involved with any of these businesses. Just a satisfied customer.
Monday, June 26, 2006
Making Wine from Kits
The fine folks at Wine Experts make a lot of wine making kits. I've made up a number of them and have been pleased with the results. Follow the directions and in a few months you'll have wine! It's fun to make. It doesn't give the creative aspects that making wine from fresh fruit gives, but it's sure nice to have around. And there are times when I like that I can just make it, knowing the results will be good.
Jumps Research - Recreating Cries of London 'Strawberries, Scarlet Strawberries'
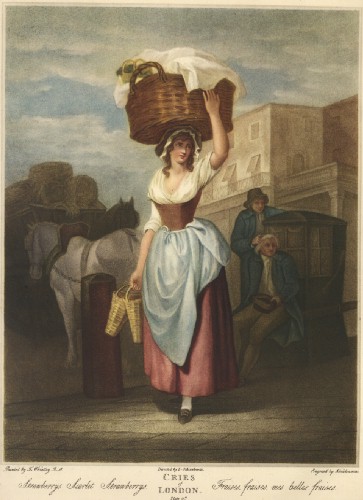
One of the pictures we found in our jumps research is a Cries of London Mezzotint called 'Strawberries, Scarlet Strawberries'. We poured over this, looking at the details, trying to figure out what is she wearing?
She appears to be wearing a shift, as one would expect from that time, even though it is not always visible. In this case we can see the sleeves. We can see she is wearing a white modesty piece/kerchief over the shift, made of what appears to be a very thin, light weight fabric, tucked into the upper-body brown garment.
We can see that the garment does not cover the bust. It appears to stop below it, and possibly curve around it. We cannot see how the Strawberry seller's garment is attached, nor whether it goes over the shoulders. Could these be jumps?
Going on the fact that a tight fitted garment that is not boned won't stay up, we decided to assume that there is some sort of shoulder aspect to the garment. We created a pattern that is like a tight-fitted vest that instead of covering the bust, goes under it, like the garment in this picture, supporting the bust some on the sides. What basically happens is that the shift is held in place by this garment, the shift then holding and providing support to the bust.
I created a garment from this pattern, did a number of adjustments to the fit, and finally got something I was happy with. It is possible the original laces or hooks behind. For my ease the garment I made laces up the front with a hook and eye at the very top. I need to be able to dress myself, and hooks or lacing behind requires help.
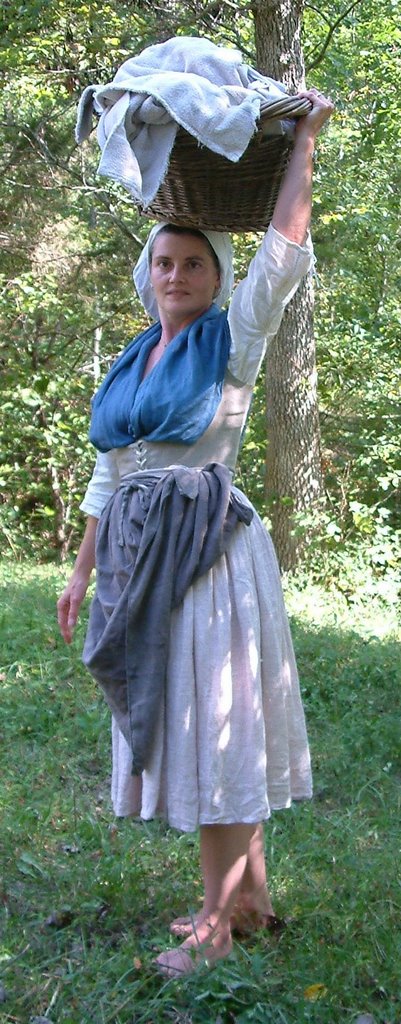
Here is a picture of the final result, noting that the fabrics and colors are nothing like the original, and of couse I'm much older as well. We didn't get the right angle, but I think this photo shows how the jumps fit the body along the sides. The bust edge of the jumps are covered by the blue modesty piece. The shoulder straps curve around where the arm attaches to the shoulder, giving freedom of the movement through the shoulders that is needed to work.
Results: I've found jumps to be extremely comfortable for low-impact work. Just the sorts of work one would expect to be doing most of the time. In fact, they are more comfortable than many modern bras.
18th Century women's wear - Stays vs Jumps
In addition to my research on petticoat length I also have been researching jumps and stays. I found it very difficult to nearly impossible to do many tasks that a woman living in the 18th century would have to do. A woman who must take care of things, that is. My character is an active, working woman. She does not have servants who will care for her and do physical tasks as might a wealthy woman.
Stays, for those who do not know, are essentially a supporting undergarment. Both men and women wore stays, although they were primarily for women as I understand it. Stays are worn over a shift/chemise, but under outer garments, especially the upper body garment. Stays are a precursor to what we are familar with as a corset, however, they were not generally worn to the tightness used in the 19th Century, as shown in Gone With The Wind.
Stays do a number of things. They helped to give the body the then-ideal cylindrical shape to the ribcage. They help support the back. And they also support the bust. There really isn't room for the bust in them, which explains the rather shelf-like effect. They certainly will bring any cleavage to immediate notice!
The first pair of stays I had was a typical back-lacing style, without tabs. While I found that my back didn't hurt after a long day of spinning or cooking, by mid- to late-afternoon they started to hit my hips just above my waist, which was very uncomfortable. This is probably due to not having tabs, but I'm not sure, not having worn this style with tabs.
My breathing was also restricted, making hurrying for any distance or running impossible. Of course, with boning from bust to below the waist, I was prevented from bending over or moving very well.
So, how can a woman who must bend over, pick things up, work with large animals or otherwise move around and do things do this in stays? The conventional re-enacting wisdom of the time said "women wore stays". How can this be? I decided there had to be more to the story.
With help from dear friends who are expert researchers in the time period and location I'm interested in, Middleground Kentucky, 1775-1776, references were found to something called jumps. No extant examples had been identified or seen in museums (my friends visit a lot of museums looking for period clothing), but there were references to both unboned and lightly boned jumps. So what are jumps? How can we tell what they were? Some references were for jumps being purchased for a woman who was pregnant or nursing. Some just referenced along with other clothing purchases.
We poured over period artwork and began to notice certain things. We all knew what a woman wearing stays looked like, what sorts of limitations on her movement stays make. We were able to identify a lot of artwork of women who by their positions or the way they looked were clearly not wearing stays. So what were they wearing? We couldn't always tell, but many had some sort of upper body garment on over a shift, with a kerchief covering the bust area but then going into some kind of upper body garment. In most cases the arms were clearly only covered by the arms of the shift. These were all pictures of women doing some sort of work, from carrying baskets, to taking care of children.
Below are some pictures I've found of women wearing jumps. I will make another post with another picture and our modern recreation of it later.
Jean Siméon Chardin
The Laundress
Jean-Honoré Fragonard
A Young Girl Reading - this young lady is clearly not wearing stays. My best guess is that she's wearing jumps under her gown.
Education is Everything - This looks like jumps, or possibly a corset blanc, which leads me to the question is a corset blanc another name, perhaps the French name, for jumps?
Rescued Pets - Cadee
 This is our little girl Cadee that we rescued November 12, 2005. She's about 16 inches tall, and weighs about 22 pounds. Sweet as can be, my son and I chose her in large part because she is very focused on people. Many of the dogs we looked at were totally uninterested in us once they were out of their cages.
Cadee was different. She was quietly interested in everything, but not obsessivly so. When I sat outside with her on leash, she sat so she could see me, then watched everything around alertly, but calmly. Whenever I moved, in the slightest, she looked at me to see what I was doing. The other dogs we looked at would totally ignore us once they had anything else to look at.
The only issue that she seemed to have is extreme submission to people. Any attempts to pet her, lean towards her, she would roll over on her back and show her tummy.
All in all, training is easiest with a dog that likes and pays attention to people. Miss Cadee is as sweet as she can be, was in the size range we were looking for, and seemed like she would be easy to train, so she came home with us.
She gets along very well with our other dog, BJ, who is enjoying having a friend to play with. She also does very well with our cat. The cat and she play together very well, too. It was a bit difficult at first for her not to chase Hawkeye, as our house rule says dogs aren't allowed to chase cats, but she got it quickly. Notice, the rule doesn't say the cat can't chase the dogs. Hawkeye will ambush the dogs as they walk through the house, jumping on them, wrapping his front legs around their necks and biting at their necks. Cadee will play with him, while BJ just sighs and keeps on moving!
Our way to bring a new dog into our home is to introduce the new one to any existing dogs outside, on leashes, in a neutral place before bringing them inside. Once inside the new one gets what I call umbilican corded - put on a leash that is tied around someone's waist. The new dog must stay with the person all the time. The only time the dog is let loose is under supervision, dragging the leash.
Having the leash on all the time means that we can prevent bad behaviors as they start to happen, and lets the dog know immediately when it does something we don't like. It's much easier to stop bad behavior when you can catch it as it occurs. And when dragging the leash you don't have to worry about actually physically catching it, you just step on or catch the leash. With someone like Cadee this is critical, as she appeared to have been abused. Physically catching her would have totally terrified her.
She is very, very responsive, but was also very afraid. When outside, if she went too far, or did something and we raised our voice towards her, or even shouted across the yard to talk with each other, she cowered and was afraid to come close. She had apparently been hurt after being called. Well, that won't happen here. We will yell at a dog to come to us, but always praise it for doing so. After all, maybe it was doing something we didn't like, but by coming to us it did do something we like.
Today Cadee and BJ have free run of the house except when we are gone. Cadee has gone from being very fearful of sudden noises and motions towards her to being happy and interested. Just like I'd hoped when we got her. She still has a tendency to roll over on her back whenever anyone wants to pet her, but I'm working on that. After about 6 months of only petting her if she was sitting I'm now only petting her when she's standing.
Rescued Pets - Hawkeye
On a cold, snowy day in December, I guess it must have been 2003, I happened to be out at Pioneer Village. It was Sunday morning, and most of the folks who had been there for the weekend had left. Four of us were wrapping things up, letting the fire burn down to nothing, and finishing up some leftover stew. I heard a cat meowing around the building we were in, so, being me, I had to go open the door and see this cat.
There had been brief glimpses of a young cat throughout the weekend, as it kept away from us, I think particularly the various dogs. There are several houses just down the road, so I didn't think to much about it at the time.
Into the cabin comes this black/grey young cat. Striped, except, no, not really striped, spotted. Interesting coloring which I hadn't seen before. Subtle, but pretty. He's so cold he's shivering, and under that lovely fur is the skinniest cat I've ever held. I can feel every rib, ever bump in his spine. There is no collar, and no one would keep a cat so skinny. Someone must have dropped him off. Some people do that, you know. Take animals out into the country and just put them out of the car and drive away. Apparently not caring that these small creatures, dogs or cats, almost never have the skills needed to survive on their own. This young cat, apparently about 6 months old, was dropped off in the winter.
We put out the last of the stew for him to eat, which he seems to really enjoy. After he has eaten he got up on the stones of the fire ring, huddling as close to the heat of the dying fire as he could.
I couldn't leave him there. He would be dead of cold or starvation in just days, if that. We didn't need another pet, already having 2 dogs at home. Well, I couldn't leave him, so I brought him back, hoping to find his home. Maybe someone hadn't dropped him off out in the country to "be free". Maybe he'd wandered away from home and some family was desperately looking for him. So home he came with me. I packed up the van and put him in.
He was apparently unshaken by being in a vehicle, got off my lap wandered around for a minute then lay down on one of the blankets in the back to doze. When we got home, he stayed in the van for a bit, watching as I unloaded. After a few minutes he jumped casually out and walked into the garage towards the house door.
Now, I don't know about you, but I've seen animals that haven't been in a building before. They stay carefully along the walls and are clearly uncomfortable. This young fellow, well, he just strolled on in like he owned the place! Good, that was one hurdle, whether he had been an indoor or outdoor cat. It was looking like maybe indoor.
Now remember, my husband and I had decided some time before that we had all the pets we need - 2 dogs. No cats at this time. And here I am coming home with this starving cat. I explain it's not to stay, just to try to find his home, or a new home for him. My husband sighs, but it's only for a few days.
I didn't let the cat go upstairs by himself. We have 2 dogs, and while they've been trained to stay inside a simple barrier, I didn't want to tempt them, or have a terrified cat dashing about the place. When he saw the dogs he hissed and growled, his tail puffing up, but he didn't otherwise seem too concerned. We had a litter box, from years before when I'd had cats, but no litter or cat food. Off we went to the store. You know whose lap he sat in on the way to the store, of course. My husband's! Down and back.
The little speckled cat happily ate the crunchy food, showing that he was familiar with that, too. For the night we put him into the bathroom with his litterbox, food and water, with something to sleep on.
The next morning I began my hunt. The cat has unique enough markings that if a vet had seen him, they'd probably remember him. Spots aren't that common. So I started calling. The first call I made the woman who answered turned out to live in one of the houses on the road to Pioneer Village! She was familiar with the little cat. She and her husband had been trying to cath it for a week or so, without any luck. The cat stayed away from their dogs. We determined that it's almost certain this little cat was dropped off to 'be free'. Poor thing!
Many phone calls later, to all the area vets and animal shelters, turned up nothing. No one seemed to be looking for this little cat. I even went on-line and put him in under the found section. In the mean time he was settling into our household quite nicely. He quickly learned that we wouldn't let our dogs chase him, so started to play with them. Everyone liked him. My husband started to say things like 'well, if we decide to keep the cat'.
It took about 2 weeks I guess before we really decided that we would give him his Forever Home. He's a really neat fellow. Very quiet, with a soft meow. He's even learned to trust people, and while he doesn't care that much for being held, he has decided to sit on our laps sometimes and purr.
Friday, June 23, 2006
Elderberries
In the part of the country where I live the elderberries are blooming. From the time I was a child I've always watched to see where the elderberry plants are during the blooming season so I'll know where to find the berries when they are ready.
These days I'm lucky enough to have elderberries growing in our garden. I've been tending them closely and have learned some things that I hadn't known before. Elderberries seem to live 2 years. They will flower both years, but then seem to die off. They spread by sending runners underground, so a new shoot will pop up out of the ground some distance from the base of the main plant. Over time a thicket can grow up, spreading each year.
To keep things tidy I've been removing the dead branches/stalks every year. New shoots come up and the plants are doing well.
This year I'm hoping that I'll get enough berries to make some things. I also plan to talk to a neighbor who has a lot of elderberries in the fence line if I can pick them.
My family doesn't eat much jam or jelly, so I won't make any of that. We will eat a pie once in a while, and I love elderberry pie! There are two other things that I made from elderberries two summers ago that I'm hoping to make more of: wine and cordial. Both of these came out extremely well, and I sure hope I get enough to make more.
One very nice thing about elderberries is that they freeze wonderfully. Whatever I don't get put up I'll be freezing for later use.
Sugar Snap Pea Pickles
Today my first batches of sugar snap pea pickles are done. Last night I just had to try them, though.
First I tried the brined peas. These were made using a recipe for brined green beans. The peas came out well, but I don't think I'll use dill as a flavoring for peas next time. Maybe tarragon. Perhaps I should put in a little of that cinnamon mint? More experimentation is needed. The flavor is good, and the texture a bit crisp.
Next we got the jar of vinegar pickled peas opened, which took a bit of wrestling. These pickles had been put in a jar with the flavorings, the cooled pickling solution poured over them, then left in the fridge for 2 weeks. Trying these immediately after the brined peas was a bit of a shock. The sourness of the wine vinegar was in direct contrast with the fermented brined peas.
However, while very different, they are also very good. We've been getting rain so with luck I'll be able to do another batch of sugar snap pea pickles before they're done for the season.
In the next day or so I'll move them from the pickling jars into small jars and hot water bath can them. Otherwise I'd have to keep them all in the fridge, which would in large part negate the advanages of pickling them!
Hands On History - Quaker Knoll Campground
The Wilmington Yearly Meeting in Clinton County Ohio has a lovely property on the north side of Cowen Lake State Park. On this property they have a camp that is used as an educational summer camp. In May of 2006 Quaker Knoll Campground became the home of a program for school aged children called "Hands On History." Contact me for information about "Hands On History".
Here is contact information for Quaker Knoll Campground and the Wilmington Yearly Meeting:
Quaker Knoll Campground
675 Sprague Road
Wilmington, Ohio 45177
937.382.5241
Map
Wilmington Yearly Meeting
Pyle Box 1194
Wilmington College
Wilmington, Ohio 45177
The Yearly Meeting offices are located at 251 Ludovic Street on the campus of Wilmington College. The offices are in Kelley Center. The phone number is 937-382-2491 or 937-382-4319.
Thursday, June 22, 2006
Barefoot in the 18th Century
I'm lucky, I guess, in that I've always run barefoot. In fact, as I write this I've kicked my sandals off and am sitting cross-legged in my chair. No one who knows me will be surprised at that!
When I got into living history proper reproduction shoes were one of the last items I got, a few years after I started. They are expensive, and at that time I was mainly doing handspinning demonstrations. First with hand spindles, later on a wheel. Spinners somehow never spin with shoes on. Socks, maybe, but not shoes. There is too much feeling lost when wearing shoes. Using the treadle on a spinning wheel is a very precise task, which you need to feel. Wearing shoes to do this would be rather like wearing mittens and trying to type.
So, I was barefoot most of the time. Then I got more into living history, worked on my character/persona. How much of the time would my 18th century character have been barefoot? What is the temperature range that's reasonable? What activities or situations would she have worn shoes?
First off, I mainly do 1775-1776 Middleground Kentucky Frontier. My character is Cohee, what today we'd call Scots-Irish. She and her family live on a stand, a working farm and inn. Typical tasks would be gardening, farming, caring for animals large and small, cooking, keeping house, sometimes hunting, laudry, textile production. Most of these tasks would be done barefoot. While she has shoes, she would only use them when they were really needed.
There is an old saying about wearing out shoe leather. Why would anyone wear out shoes if they don't have to? Making, or having footwear made, takes time or resources. Keeping what one has in good shape for times of need makes more sense.
As I'm wont to do, I did some tests. Clearly going barefoot when it's warm makes sense. In fact, it's safer than wearing shoes because the bare feet will help cool the body. But what about when it's not as hot? What about rain, snow? Well, I've certainly left my share of bare footprints in the snow, so I knew that was done. We also have references to bare feet in winter, although most dealing with the hardships which caused that to happen.
So how cold does it need to be before it becomes uncomfortable? It depends. If it's raining and muddy, I'd rather be barefoot even down to freezing temperatures, because it's so much faster to get feet warm and dry than it is to get socks and shoes warm and dry. Also, feet are ever so much easier to clean than muddy shoes!
In several years of experimenting I've found that I'm comfortable barefoot at any temperature above 45 F. I can handle down in the lower 40's or below, but that's no longer what I'd consider comfortable, and I know I loose a lot of body heat at those temperatures.
Pickling
I found an interesting book at the book store about pickling called "The Joy of Pickling" by Linda Ziedrich. It reminded me of a time when I was a child and we'd tried to make pickles without success. For some reason pickling wasn't a part of my family tradition. We'd make what I now know are fresh type pickles, such as cucumbers in sweetened vinegar eaten immediately, or over a couple of days leftover. But the one time we'd attempted canning pickles they came out soggy. Being kids we wouldn't eat them, and somehow we never tried again.
The memory of that time came back when I saw this book. It was paperback, and with all the glorious produce we get from our garden it seemed like this was a sign it was time for me to try pickling. I took the book home, and read through the first few sections, where it describes the various kinds of pickles. What I found was that pickling is ancient, which I'd rather known, but this meant a lot more to me know, due to my living history involvment.
I would be able to make pickles that don't need refrigeration, which would make them perfect for taking to events. I don't like to bring coolers or many other modern things when I do living history things, so these pickles would fit right in.
There are two basic kinds of pickling. Most of us are aware of vinegar pickling, where produce is put in vinegar for preservation. Less well known is fermenting in brine. Perhaps I should say that the results are known, but many of us aren't as aware of how these pickles are made. Sauerkraut is a type of fermented pickle. So are dill pickles.
Last summer we had a lot of green beans. I found an interesting brined beans recipe. Brining is really easy. You make the salt-water solution, layer the items to be pickled in some sort of container, then cover with the brine. I've been using ceramic or glass canisters with a wide mouth. Put something on top to keep the items under the surface of the brine, and leave it for about 2 weeks. Every day you must clean off the surface and make sure the items are under the surface of the brine.
Easy, and the end result is like nothing you can buy in the store.
Wednesday, June 21, 2006
Dandelion Wine
I've been making wine at home for a few years now. I got started thanks to my husband's gardening book that had 'instructions' for making dandelion wine. I think it was "Jerry Baker's Old Time Gardening Wisdom" by Jerry Baker and Kim Gasior. I found out later, the hard way, that it wasn't really instructions, more like a loosely defined outline for what to do! Or perhaps a wine makers notes written up by a non-wine maker. In any case I followed the instructions.
Dandelion flowers, while you will see some as long as it's warm enough, really come on full tilt only in early spring. That first flush of flowers is the best time to gather them. My instructions said that I could freeze the flowers packed into a milk carton. Yes, the old waxed cardboard kind that you rarely find in the gallon size these days. I substituted a gallon plastic freezer bag with good results.
Have you ever tried to pick gallons and gallons of dandelion flowers? I hadn't, and as I looked around me at all those lovely golden yellow suns shining up at me, and the very few I'd managed to gather, it came to me. Children! Yes, children are the key. Ha! In I went, bag in hand, to call my boys. Would they pick enough dandelion flowers to fill a gallon freezer bag if I paid them $1.00 per bag? Yes! And back out we went.
Over the course of the next few days we all picked dandelion flowers. They must be picked or cut carefully, so as not to get any of the stem, which is bitter. Just the flowers.
I'll have to check the instructions, but we needed something like 4 or 5 gallons of flowers to make the 5 gallons of wine. That's a lot of flowers!
The instructions said that it is best to take the green outer part off the actual flower petals, but I just wanted to get this going, not spend a million years taking apart flowers, so I took the other option and just put them in. I used our VitaMix on the lemons & oranges instead of squeezing them for juice. I don't think I'll do this another time, but it was fast and that's what I wanted.
I had never made any wines before this. The instructions said to put everything in a 5-gallon carboy and fill it up to within a couple inches of the bung. So I did. Anyone who has ever brewed or made wine before will probaby be cringing about now.
I put the yeast in per the instructions, put on the airlock, covered the whole thing with the box the carboy came in to keep the light out, and went off to a meeting.
About 4 hours later I returned. My husband said that it had been making sounds while I was gone. I took the box off, and it was clearly bubbling like mad. I briefly went into the other room and almost immediately we heard a *Bam!!!* Back I come to find lemony-orangy-dandelion flower moosh that had exploded out of the carboy, blowing the bung and airlock off. There was mooshy wine bits going up the newly painted wall, on the ceiling, splattered in every and all direction for up to 20 feet! Walls, ceiling, cabinets, computer, windows, you name it, there were bits on it.
My husband, bless his heart, just looked at me and said "Please don't let this happen again" then helped clean it all up.
Since that day I have learned to use a bucket for primary fermentation.
Hem lengths in 18th Century women's clothing
At the moment this post is a work-in-progress. I need to get links to some of the artwork and such, but this is a start.
For several years I've been doing research on 18th century working women's clothing. When I'd first gotten into Living History I was told repeatedly that women wore shift, petticoat, some sort of upper body garment such as a gown, shortgown or jacket, stays and a hat or cap. The petticoat hems were long. Ankles weren't to show.
So I wore long petticoats. And remembered a childhood vow to never again wear skirts or dresses! Going up stairs long petticoats are dangerous. The hems must be held up, in your hands, to keep from stepping on the hem and tripping yourself, probably breaking something and ripping your clothing as you go down. I don't know about you, but I'm usually carrying something when I go up or down stairs.
If you crouch or bend down, or even get up from sitting in a chair, you end up stepping on the hem as you try to get up. This is neither graceful nor safe.
Let's go outside. Long hems trail in the grass and weeds. If it's wet out, your long hems will be wet to at least the knees. Wet clothing is not only uncomfortable, it's heavy. Your wet and muddy feet will brush the back and possibly the fronts of the hems as you walk, transferring mud and wet to your petticoats. Wet is bad enough. Cold and wet is miserable.
I start making some petticoats in slightly shorter lengths, both to see what happens and to match some period artwork. One day I'm living in a field next to the river in St. Charles, Missouri, staying in a half-faced shelter. It's been wet and cold for a couple of days. I'm wearing a hemp petticoat that is about 4 inches above my ankles. While it's not currently raining the ground and grass are soaking wet. Therefor my hems are wet, cold, somewhat muddy, and keep wrapping itself around my calves. In the back as I walk the hem bounces off my feet, picking up mud and water from them. I'm cold. The wind and wet pulls precious heat from me. The hems are wet for 6 or so inches, and damp another inch or so above that.
Being restricted by my petticoats is dangerous, as I'm working with horses and must have freedom of movement and my attention on the horses. I can't afford to be messing with my clothing. It has to just work, except it's not.
When I get a break I get out my sewing scissors and cut about 2 inches off the length of my petticoats! This puts the end about at the largest part of my calf.
Eureka! That's it! This is long enough that I can move freely, short enough that the hem isn't in the grass, nor do my feet hit it in the back when I walk. For the first time in days the hem of my petticoat dries out. I'm warmer already, even though the length is shorter.
I find I can now go up and down stairs safely, since the hems don't drag like they did before. I can even manage to make it through rough woods, climbing over downed trees and through creeks without the trouble I had before. I can do things like garden, bending over to pull weeds, without stepping on my hems.
All in all, my experiences prove to me that any woman working in the 18th century doing these sorts of things would be wearing petticoats that are mid-calf in length. Which the period artwork shows.
Subscribe to:
Comments (Atom)